Merge Request How-To
This page contains step-by-step instructions for implementing merge requests in Gitlab. For an description of merge requests, please see the merge overview.
Create Review Branch
When you reach a milestone or complete a new feature, you should merge it into the upstream repository. However, if your development branch contains many new commits, you should first consolidate the updated code onto a review branch. This will reduce the work for your reviewer and can greatly speed up the code review process.
First, create a review branch. You can do this by following the same instructions used to create a development branch, but using a different name for the new review branch. The following examples use review as the branch name, but feel free to use something else in your own projects.
Next, copy the final code from the development branch into the review branch. If you deleted files in the development branch, be sure to delete those files in the review branch as well. Commit these updates to the review branch with a single commit. The commit message should be something like Added new feature X rather than copied development branch, as the former clearly indicates what has changed in the code.
At this point, the code on the review branch should exactly match the development branch, and you should use the branch comparison tool to ensure that this is the case. To use the tool, navigate to the main page of your fork of the repository. Then, click on the Compare branch button:
Show Button

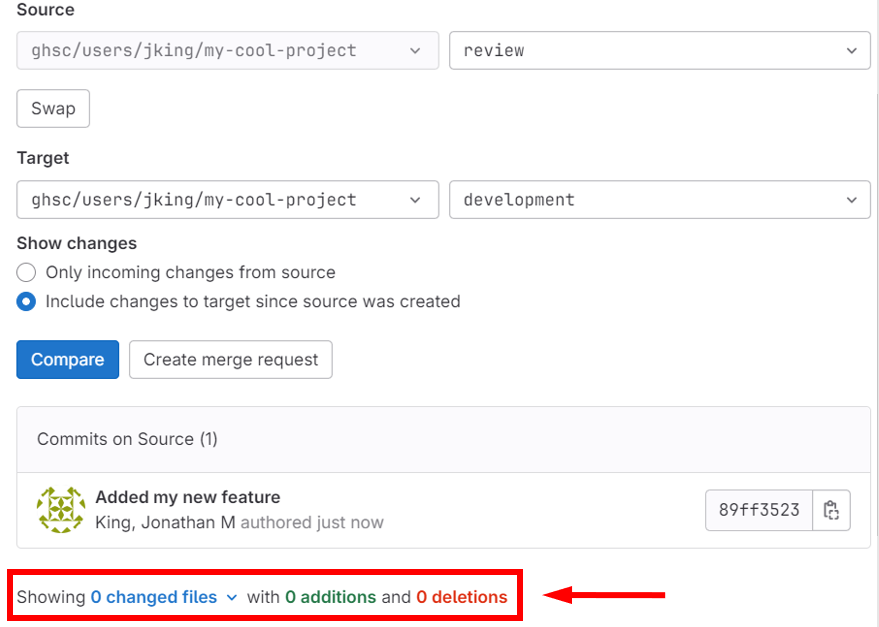
This will open a page asking you to indicate the source and target branches to compare. You should set the source to the review branch of your fork of the repository. The target should be the development branch in the fork. (Note that neither branch should be on the upstream repository). Then in the Show changes section, select the Include changes to target since source was created option.
Show Example

Then click the blue Compare button. This will run the comparison tool. If the branches are equivalent, then the comparison should indicate “0 changed files” with “0 additions and 0 deletions”.
Show Example
If the branches are not equivalent, then the comparison will indicate how they differ. You should resolve these discrepancies, commit the changes, then repeat this process to ensure that the branches are equivalent.
Create Merge Request
As you write your code, you’ll periodically reach major milestones that complete various features of the code. When you have completed a feature, you should create a merge request so that the code can be reviewed and added to the upstream repository. You should do a merge request even if you expect the code to change later, as this:
allows others to provide feedback on your work,
simplifies the review process, and
facilitates releasing your code.
Tip
If your milestone includes many commits, you should merge a review branch rather than the development branch.
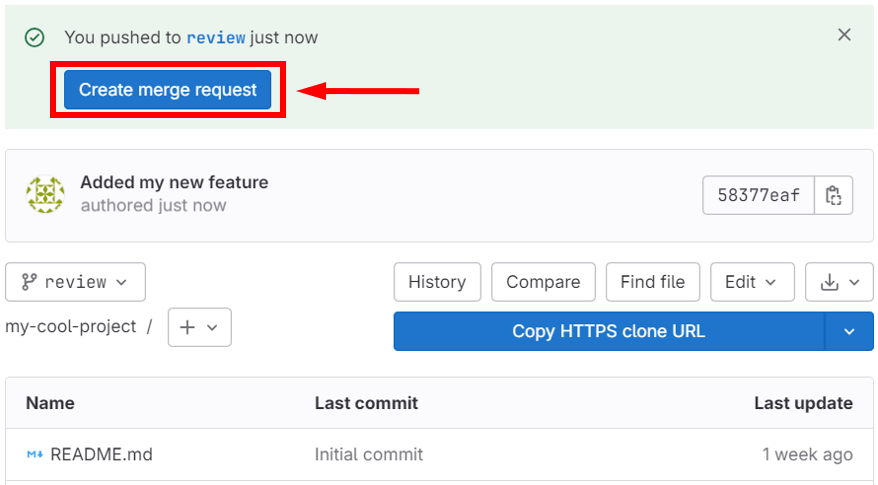
To start a merge request, head to the main page of your repository fork. If you have edited your code recently, you will likely see a Create merge request banner at the top:
Show Banner
If you do not see this box, then see the instructions for creating merge requests manually before continuing.
Click on the Create merge request button in the banner. This will take you to the page for a new merge request.
Add a title and a description for the merge. This is a good place to provide any extra information needed by the reviewer.
Tip
The description box uses Markdown rendering so you can enchance your description with headings, bullet points, checklists, and other useful formatting features.
Show Example

Next, in the Assignee box, assign the merge request to yourself or whoever will be responsible for reconciling the review comments. Then, assign the reviewer. The reviewer should have agreed to provide both a security review and a code review, and they should be familiar with the programming languages used by the project. The reviewer is not required to have expertise with the scientific topic of the code, although this is usually helpful. Note that the reviewer should have a developer role within the project - for more details, see the instructions on adding a developer to the project.
If you are using milestones, you can set a milestone now. Otherwise, you can leave this box blank. Next, apply the labels Security Review and Code Review to the merge request. If you have not yet created these labels, you can do so by clicking the Create project label button in the dropdown box. Finally, set the merge options as you like. If you’re not sure what these are, just leave them in their default settings.
Show Example

Once this is complete, click on the Create merge request button to finalize the request. This will notify the reviewer that the code is ready for review; however, you may also want to notify them yourself.
Review Merge
Once the merge request has been created, your reviewer should conduct both a security review and a code review. You can find instructions for these steps on the Security Review and Code Review pages.
Complete Merge
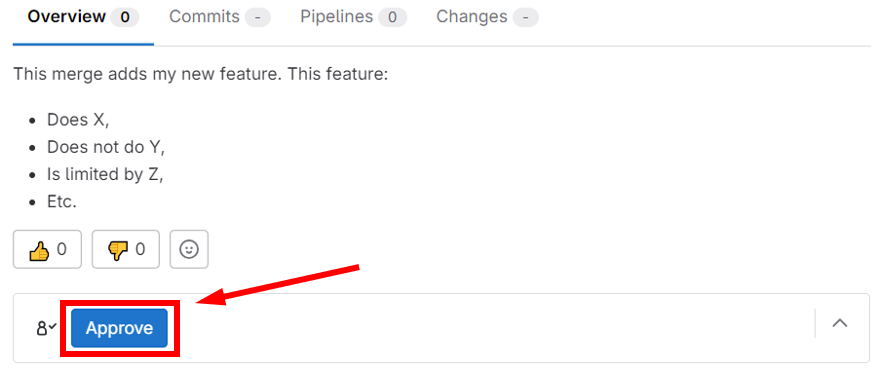
Once the reviewer is satisfied with the merge request, they should click the blue Approve button:
Show Button
Note
If the reviewer cannot see the Approve button, then you may need to assign them a developer role. See the instructions on adding a developer for details.
Once the code is approved, you can enact the merge. Click the blue Merge button to merge the code from your fork to the upstream repository:
Show Button

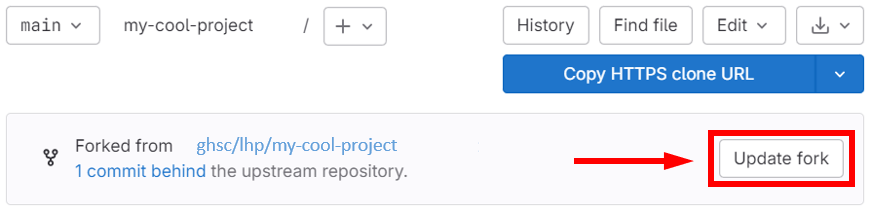
At this point, the approved code has been merged into the upstream repository. As a final step, you’ll need to update the main branch of your fork so that it mirrors the upstream. To do so, switch to the main branch of your fork, and click the Update Fork button:
Show Example
Next Steps
That’s it, the merge is complete! You can now create a new development branch and start the next iteration of the development cycle. Alternatively, if your code is ready for a release, you can now begin a domain review.